
Lando
Lando has become a popular tool in the Drupal world. It provides a layer of abstraction to Docker and docker-compose, which are the tools that make everything work under the hood. You don’t even need to learn Docker in order to use it! Another advantage is that the configuration relies on a single .yml file.
For this article, we will create a sample project using composer's create-project command:
composer create-project drupal-composer/drupal-project:8.x-dev --stability dev --no-interaction
Note: This post also assumes that you are running Lando already.
In this example I will be using the following: .lando.yml file:
name: my-lando-app
recipe: drupal8
config:
  webroot: web
Exposing the ports
Lando provides a useful command named info
lando info
This command exposes information about our running containers or “services” in Lando terminology. The following is example output from this command, note the service we are looking for is database:
{
    service: 'database',
    urls: [],
    type: 'mysql',
    internal_connection: {
      host: 'database',
      port: '3306'
    },
    external_connection: {
      host: 'localhost',
      port: '32793'
    },
    creds: {
      database: 'drupal8',
      password: 'drupal8',
      user: 'drupal8'
    },
    config: {
      database: '/home/isramv/.lando/config/drupal8/mysql.cnf'
    },
    version: '5.7',
    meUser: 'www-data',
    hostnames: [
      'database.mylandoapp.internal'
    ]
  }
The external_connection key shows localhost with the port of 32793, unfortunately this port changes from time to time, but it can be persisted by setting a fixed port in the .lando.yml file as noted in the official documentation
Example:
name: my-lando-app
recipe: drupal8
config:
  webroot: web
services:
  database:
    portforward: 37001
After executing lando rebuild and lando info the external port is now37001.
 {
    service: 'database',
    urls: [],
    type: 'mysql',
    internal_connection: {
      host: 'database',
      port: '3306'
    },
    external_connection: {
      host: 'localhost',
      port: '37001'
    },
    creds: {
      database: 'drupal8',
      password: 'drupal8',
      user: 'drupal8'
    },
    config: {
      database: '/home/isramv/.lando/config/drupal8/mysql.cnf'
    },
    version: '5.7',
    meUser: 'www-data',
    hostnames: [
      'database.mylandoapp.internal'
    ]
  }
Integrating with Drupal
When creating a new Drupal 8 site, use the internal Lando connection information, (which is database instead of localhost) for Host, as shown in the following screenshot:

PHPStorm
PHPStorm has a plugin named Databases, which we will use to access our database. It usually comes pre-installed with PHPStorm, but if it isn't, you can go to File -> Settings -> Plugins and search for it as: Database Tools and SQL.
Using the Database plugin from PHPStorm
Go to View -> Tool Windows -> Database using the main menu.

Using the Plus sign, click on Data Source and Select MySQL
The driver will be updated occasionally, but this is an easy process managed by PHPStorm.
We fill out the form using the information provided by Lando, via the lando info command.
Host: localhost, Port: 37001, User, Password and Database are drupal8. If you click on Test Connection it should return a success message like in the following screenshot.
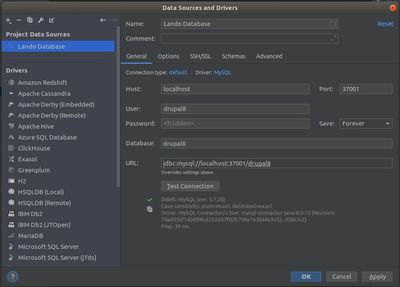
If everything is correct just click Apply and then OK.
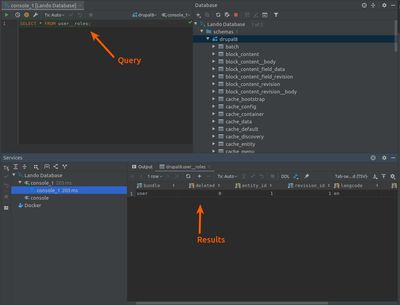
Now you will be able to access the database via the PHPStorm plugin, allowing you to inspect and query the database from PHPStorm.

Querying the Database with PHPStorm
Open a console:

The great advantage of using PHPStorm console is that you can use the autocomplete feature:

After the query is executed:
Importing your Database
If you want to import your databases using the lando db-import, the dump file needs to be in the root of the repo, so the database backup is accessible within the containers. However, having your database dumps in the root of your repo is dangerous, since those files could be committed by mistake if you are using Git or any other version control.
In my case, I have the database backups in a different folder on my system: (~/isramv/Sites/db_backpus). So instead of using lando db-import, I manually select the .sql file using the Run SQL Script option as shown in the following screenshot.
Note: It is important to unzip your SQL file before importing it.
Example:

Result:

Dropping all database tables
This can also be achieved with the PHPStorm Database Plugin.
For example, I usually select the first table, scroll down to the last one while holding shift and I click on the last one, then click the secondary button to open the secondary dialog and click on Drop:

After a confirmation dialog the tables will be erased from your Database.
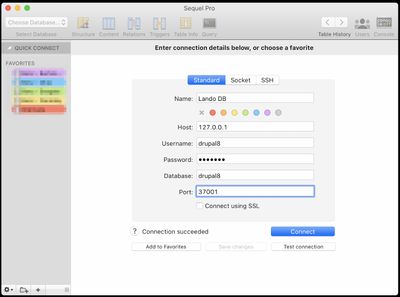
Sequel Pro
Setting up your connection
Again, executing lando info will provide the connection credentials. You can either set up a favorite connection or use Sequeal Pro’s “QuickConnect” feature:
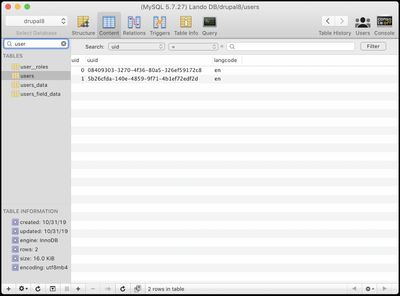
Viewing and editing rows in our tables
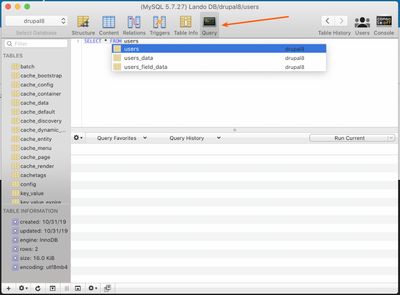
In the following screenshot, I filtered the tables by typing user in the search box, and if content icon is selected at the top the table information for user is going to be displayed:
Querying the Database with Sequel Pro
Clicking on the Query icon will display a text area with a useful autocomplete dropdown:
Importing your Lando Database
On the main menu, click on File -> Import and select your sql or sql.gz file.
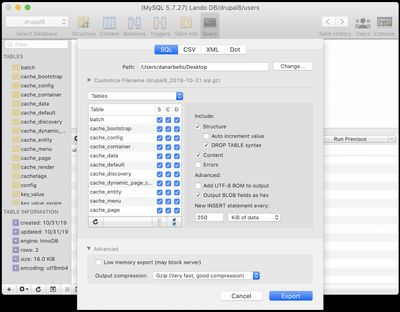
Exporting your Lando Database
On the main menu click on File -> Export and the following dialog will help you export your database.
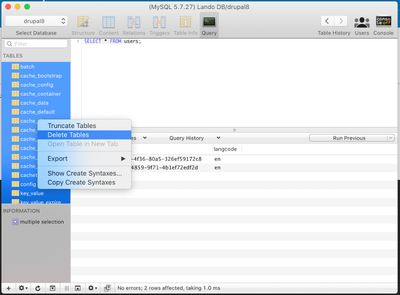
Dropping your tables
- Select all tables, you can use Command + A, or clicking the first element and hold Shift and selecting the last element.
- Right-click and select Delete Tables.
- Confirm the deletion of tables in the dialog.
Here's what it looks like when you right click on any of the selected tables:
MySQL/MariaDB Command line
I use MariaDB, which is compatible with MySQL, since I am on Ubuntu 18.04, but you can easily use the mysql client. To install MariaDB client on Ubuntu, you can use:
sudo apt install mariadb-client
Please note that I am only installing the client, not the mysql server, since the mysql server is going to be running “inside” lando in a container.
If your mysql client installed correctly, you should see the following after you run mysql -V
mysql Ver 15.1 Distrib 10.3.17-MariaDB, for debian-linux-gnu (x86_64) using readline 5.2Accessing the database with the CLI client
mysql --host=127.0.0.1 --port=37001 --user=drupal8 --password=drupal8 --database=drupal8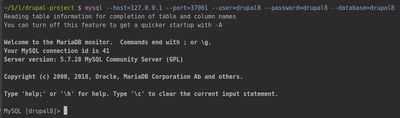
Executing Queries
After accessing the database, you will be able to query the database from the terminal:

Importing the Database
Example:
mysql --host=127.0.0.1 --port=37001 --user=drupal8 --password=drupal8 --database=drupal8 < /path/to/your/db/folder/backup-latest.sqlExtras
I omitted the drop of tables in the mysql command line examples, because there is a more efficient way if you are working on Drupal with Lando:
lando drush sql-drop
No matter what database tool you choose, Lando is a powerful tool for developers of all levels and great for distributed teams. I highly recommend reading the documentation to take advantage of all the customizations and features it has.


