
We're finally at the end of our Google Places Autocomplete journey.
Other posts in this series:
- Implementing Google Places Autocomplete with ES6 - Part One
- Implementing Google Places Autocomplete with ES6 - Part Two
- Implementing Google Places Autocomplete with ES6 - Part Three
In part one we implemented the standard Google Places Autocomplete widget on an address form but discovered a bug that tarnishes the user experience for some addresses.
The Bug: Street numbers are stripped for some addresses.*
Part two took a closer look at the methods that are packaged together in the standard Autocomplete widget that's provided by Google. In our examination, we discovered that we were unable to fix this bug by filtering the results returned from Google in the standard widget.
A closer look suggests that we can filter these results if we rebuild the widget. We can do this by separating the Google Places JavaScript API methods that return predictions from those that return the place data when a prediction is selected.
But first, let's review our user story for this feature:
When a user enters an address into the street address form field, generate a list of predictions from which the user can select to populate the address form.
Let's take a look at a list of tasks that we need to complete to rebuild the widget, which also outlines this post:
- Define and document what the standard widget does from a user's point of view, so that we don't introduce any new UX regressions.
- Examine the API for the methods that we need in order to build our own Autocomplete Widget.
- Write the code by using our appropriate API methods and tie them to event listeners to build the widget.
- Discuss the burden of maintaining a custom widget.
- Debrief by taking the lessons we've learned about discovering bugs and resolving them.
Understanding the Widget
To get started, let’s plainly define and document what the standard Google Places Autocomplete widget is doing.
- First, the widget understands a user's keyboard inputs on a particular field keyed to a form element’s ID.
- Second, the widget uses the string of text a user inputs in the field to make a call to the Places API.
- Third, the widget builds elements in the DOM by a call to the Places API. It updates the elements in the DOM based on the user's input that refines or removes previous suggestions.
- Fourth, each element that is returned and built in the DOM comes with a package of event listeners that are attached to the element. If an element is selected it will populate the form with the places autocomplete data. A "selected" class is dynamically added to a prediction in the list based on the mouse as well as keyboard interactions.

- Finally, the container for the elements that are returned from Google each have event listeners that correspond to specific mouse or keyboard interactions.
- The up arrow moves up the prediction list and selects the bottom most prediction when pressed at the top of the list.

- The bottom arrow key reciprocates this interaction moving down the list, snapping back to the top when pressed again at the bottom of the list.
- The Tab and Enter keys, as well as clicking on a prediction, all select that prediction in the list and populate the fields.

- The escape button closes the prediction list without populating the form.
- The up arrow moves up the prediction list and selects the bottom most prediction when pressed at the top of the list.
All of these interactions are included for free with the standard widget. If we’re going to build our own custom widget to fix the bug we found, we are going to have to replicate these interactions so our users don’t experience any regressions. Yes, this is a lot of code to write, which raises some questions about the maintainability of this widget which we'll address later, but for now, let's assume that we need this interaction to work for all users and that we're prepared to invest the time and effort necessary to maintain this.
An examination of the Google Places JavaScript API Methods
In part 2 we took a brief look at the methods we may need to build a custom widget. To review, here are the API methods we'll be using to build our widget:
New google.maps.places.AutocompleteService()-- Initializes class with methods for retrieving Autocomplete predictions.getPlacePredictions-- Retrieves place autocomplete predictions based on the supplied autocomplete request.New google.maps.places.PlacesService-- initializes the PlacesService class.google.maps.places.PlacesService.getDetails-- gets the details based off of the place.id from the prediction list.
These are the API methods we'll need in order to build our custom widget. Let's organize these so that we can better understand the overall hierarchy and the dependencies of these methods.
- 1 and 2 react to text input and return predictions from the API.
- 3 and 4 are attached to each prediction and add autocomplete functionality.
Once again, let's plainly describe our approach to rebuilding the widget before we code anything so that we have a solid idea of the methods we’ll need to create before getting into the thick of it.
Building a Custom Widget: Architecting a Solution
In describing the code example from Part 1 of this series we have the following:
- Define and map the google components.
- Define the autocomplete form field
- Initialize the autocomplete object from Google.
- Clears any existing event listeners on the field.
- Adds the
place_changedGoogle autocomplete listener - Get the
placefrom the autocomplete object based on the user input. - Parse the returned
place. - Populate the matching form elements.
The bug we're addressing is critical to steps 5, 6 and 7 in the sequence above. Because we're calling the API directly instead of using the Google Autocomplete widget, we won't be able to add the default widget’s place_changed listener though we'll need to mimic its interactivity. Luckily, we defined this above in "Understanding the Widget". Therefore we should redefine step 5 as the following:
5. Generate a list of predictions based on keyboard inputs in the autocomplete form field.
This will require making an API call based on the user inputs of the field, generating a list of predictions, applying event listeners to each prediction, generating a list of elements in the DOM and appending it to the autocomplete form field. We’ll also have to clear out, update or remove the list of predictions when a user returns to the field or deletes characters.
You can already see that the task of building the prediction list is quickly growing in scope and effort. Yet in redefining 5, we'll have to adjust 6 so that it accounts for the separation of logic between the prediction based on inputs and autocompletion through user activity within the field.
6. Parse through the autocomplete object of a selected prediction and continue on if the object matches our level of specificity.
This is where we'll actually resolve the bug. Note that in the description above, we are only going to continue on with the autocompletion if the object matches our criteria. The perfect solution to this bug would be to always continue on and to populate the form with any address that even appears in the prediction list. Unfortunately this is not possible at this time.
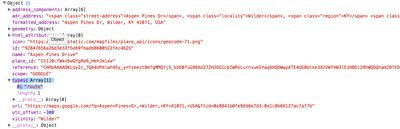
The predictions that are returned from Google, and the data used to autocomplete the form do not come from the same service at Google. The predictions look like that is the case, but when you dissect the widget, you’ll see that level of specificity becomes more broad when the widget cannot confirm the location. If it can’t confirm the street numbers, it’ll check the street, then the locale, city, state, etc. This is evident in the place object's properties when observed in the browser console:
Place object of a proven address:

Place object with from "buggy" address:
We are going to have to compromise by separating the prediction logic and the autocompletion logic so that predictions visible to a user can indeed always be populated with the autocomplete.
Because we've separated out the prediction logic from the autocomplete place retrieval, we're able to apply a filter on the prediction returned from Google and ultimately match the level of specificity we need for our form. Luckily steps 7 and 8 remain the same.
Now that we have some guidelines on what we need to code, let’s translate these definitions into ES6.
Building a Custom Widget: Writing the Code
Because of the scale and scope of re-writing a custom widget, this will be more of a detailed outline for how to code a solution rather than a complete implementation.
First we are going to remove the widget from our current implementation on line 9 below.
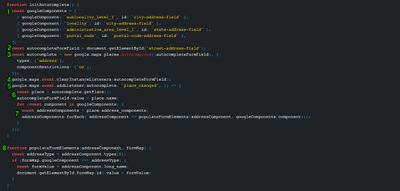
initAutocomplete() {
  const googleComponents = [
    { googleComponent: `sublocality_level_1`, id: `city-address-field` },
    { googleComponent: `locality`, id: `city-address-field` },
    { googleComponent: `administrative_area_level_1`, id: `state-address-field` },
    { googleComponent: `postal_code`, id: `postal-code-address-field` },
  ];
  const autocompleteFormField = document.getElementById(`street-address-field`);
  // AUTOCOMPLETE WIDGET CODE DELETED
}
Now that we’ve removed Google’s standard Places Autocomplete widget, we can begin to build our custom widget by writing functions. Inside of these functions we’ll be making calls directly to the API based on the input of our text field to generate a list of predictions. A skeleton of it could look something like this:
initAutocomplete() {
  const googleComponents = [
    { googleComponent: `sublocality_level_1`, id: `city-address-field` },
    { googleComponent: `locality`, id: `city-address-field` },
    { googleComponent: `administrative_area_level_1`, id: `state-address-field` },
    { googleComponent: `postal_code`, id: `postal-code-address-field` },
  ];
  const autocompleteFormField = document.getElementById(`street-address-field`);
  // Initializes Google Places Autocomplete
  this.initGooglePlacesAutocomplete(autocompleteFormField);
}
Notice that we’re writing self documenting functions that follow the single responsibility principle. Each function’s name describes what it is doing so our comment above isn’t truly necessary. We are initializing a Google autocomplete service class and setting the groundwork for building elements in the DOM. Note as well that we’re taking advantage of some ES6 here by setting a constant variable to using the this keyword.
initGooglePlacesAutocomplete(autocompleteFormField) {
  const autocomplete = new google.maps.places.AutocompleteService();
  const predictionList = this.predictionListMarkup();
}
Here, thisis globally scoped, allowing us to call functions outside of the scope of the function it is in. This means that no matter what, our variable const predictionList will always be set to what it was when it was created.
Next let’s build a markup container for the DOM and append it to our form field so that the UI is the same as Google’s default widget.
initGooglePlacesAutocomplete(autocompleteFormField) {
  const autocomplete = new google.maps.places.AutocompleteService();
  const predictionList = this.predictionListMarkup();
  document.getElementById(autocompleteFormField.parent()).appendChild(predictionList);
}
In order to preserve any custom styling we have already written for the original widget, we'll need to match the default class names from the original Google autocomplete widget.
predictionListMarkup() {
  const predictionsWrapperDiv = document.createElement(`ul`);
  predictionsWrapperDiv.classList.add(`pac-container`, `pac-logo`);
  return predictionsWrapperDiv;
}
Now let’s add an input event listener to each prediction in the list. This way, our widget is interactive. Each input will make an API prediction call to return prediction data from the Google Places JavaScript API.
initGooglePlacesAutocomplete(autocompleteFormField) {
  const autocomplete = new google.maps.places.AutocompleteService();
  const predictionList = this.predictionListMarkup();      document.getElementById(autocompleteFormField.parent()).appendChild(predictionList);
  autocompleteFormField.addEventListener(`input`, () => {
  if (autocompleteFormField.value) {
    predictionList.style.display = `block`;
    autocomplete.getPlacePredictions({
      input: autocompleteFormField.value,
      types: [`geocode`]},
      (predictions, status) => {
        this.displayPredictionSuggestions(predictions, status, predictionList, autocompleteFormField);
      }
    );
    } else {
      predictionList.style.display = `none`;
    }
  });
}
Let’s examine the code above as there’s a lot happening.
- Lines 1-3 are the same as they were when we first wrote them.
- Line 4 adds an input event listener to our form field.
- Lines 5 and 6 includes logic a conditional that controls the display and logical flow for our new prediction markup when the address form field is populated.
- Line 7 makes the autocomplete request to the Google Places JavaScript API with the
.getPlacePredictionsmethod the geocode parameter in line 9. - Line 10 returns the results of the call in line 7 and passes them on as parameters in with the function using ES6 arrow functions in line 10.
- Line 11 uses the
thiskeyword and callsdisplayPredictionSuggestionsfrom the global scope. - Line 15 hides the prediction markup when the address form field is empty.
The displayPredictionSuggestions function hides our markup wrapper if the service is down, as well as calling predictionBuilder to actually iterate through the autocomplete predictions returned from our autocomplete request.
displayPredictionSuggestions(predictions, status, predictionList, autocompleteFormField) {
  // If the service is down, do not return results.
  if (status !== google.maps.places.PlacesServiceStatus.OK) {
    predictionList.style.display = `none`;
    return;
  }
  for (const prediction of predictions) {
    this.predictionBuilder(prediction, predictionList, autocompleteFormField);
  }
},
The predictionBuilder function will preprocess our prediction results by creating HTML elements and adding an autocompleteServiceListener function gives us the control that we need to address the bug and separate the logic.
predictionBuilder(prediction, predictionList, autocompleteFormField) {
  // strict prediction filtering based on the street address verification.
  const predictionListItem = document.createElement(`li`);
  predictionListItem.classList.add(`pac-item`);
  predictionListItem.appendChild(document.createTextNode(prediction.description));
  predictionListItem.addEventListener(`click`, () => {
    this.autocompleteServiceListener(prediction, predictionList, autocompleteFormField);
  });
  predictionList.appendChild(predictionListItem);
},
The core of our bugfix is the autocompleteServiceListener function. This will only be called when a prediction from our list is selected by a click. Within this function we’ll invoke the PlacesService API class and return the details of that place based on the prediction’s place_id property. The _ place_id_ property is a string that corresponds to a unique place within Google’s Places API database. We can then use this property as a parameter when calling .getDetails, which returns a place object from the API. As we investigate the properties of this object in the console, we can check to see if there is a difference between an address that exhibits the buggy behavior of removing address numbers from input field and the other that returns the selected autocomplete address in full.
Place object of a proven address:
Place object with from "buggy" address:
We can see that within the Types array, the first element corresponds to the specificity of the place (note that this is an oversimplification of the process to vet this as an acceptable solution). With our example address, we can see that we have a street_address. With the address that causes the bugged behavior, we can see that it’s a higher level route. From this we can deduce that by applying a filter to our results based on this property we can then only populate the form fields if the first item in the place’s types array is a street_address.
autocompleteServiceListener(prediction, predictionList, autocompleteFormField) {
    const service = new google.maps.places.PlacesService(autocompleteFormField);
    service.getDetails({
      placeId: prediction.place_id,
    }, (place, status) => {
      if (status === google.maps.places.PlacesServiceStatus.OK) {
        if (place.types[0] === `street_address`) {
          this.fillInAddress(place, autocompleteFormField);
        } else {
        // maintain user input in field, that's all.
          autocompleteFormField.value = prediction.terms[0].value;
          predictionList.style.display = `none`;
        }
      }
    });
  },
Now that the bug is fixed, we can decide what we want to do if the selected place does not pass the specificity filter. For now, we’ll do the following:
- Remove the prediction from the predictions list.
- Leave the user’s input in the field as is and do not populate any other fields.
Finally, we’ll have to address all the possible ways a user may select a prediction from the list, as well as allow the user to transverse the list by using a keyboard as an input method.
displayPredictionSuggestions(predictions, status, predictionList, autocompleteFormField) {
  // If the service is down, do not return results.
  if (status !== google.maps.places.PlacesServiceStatus.OK) {
    predictionList.style.display = `none`;
    return;
  }
  for (const prediction of predictions) {
    this.predictionBuilder(prediction, predictionList, autocompleteFormField);
  }
  this.autocompleteKeyboardListener(predictions, predictionList, autocompleteFormField);
},
Each of these should be a self-documenting single method that responds to an event, including specific keys such as tab, enter, up and down. We do this by identifying the corresponding keycode:
autocompleteKeyboardListener(predictions, predictionList, autocompleteFormField) {
  const autocompletePredictionMarkup = document.querySelector(`.pac-container`);
  this.keyCodeListener = (event) => {
    switch (event.keyCode) {
      case 38:
      // UP
        this.upKeyAutocompleteInteraction(autocompletePredictionMarkup, autocompleteFormField);
        break;

      case 40:
        // DOWN
        this.downKeyAutocompleteInteraction(autocompletePredictionMarkup, autocompleteFormField);
        break;

      case 9:
        // TAB
        this.keyboardAutocomplete(predictions, predictionList, autocompleteFormField, this.keyCodeListener);
        break;

      case 13:
        // ENTER
        this.keyboardAutocomplete(predictions, predictionList, autocompleteFormField, this.keyCodeListener);
        break;
      }
    };
  autocompleteFormField.addEventListener(`keydown`, this.keyCodeListener);
},
For the up and down keys, we have similar functions that are purely cosmetic so that the user will know what prediction they are on as they traverse up or down the list.
upKeyAutocompleteInteraction(autocompletePredictionMarkup, autocompleteFormField) {
  if (!(document.querySelector(`.pac-selected`))) {
    // Returns the bottom of the list.
    return this.autocompleteListDecorator(autocompletePredictionMarkup.lastChild, autocompleteFormField);
  } else {
    // Transverse the list in reverse order.
    const previousSibling = document.querySelector(`.pac-selected`).previousSibling;
    if (previousSibling) {
      this.autocompleteListDecorator(previousSibling, autocompleteFormField);
    } else {
      // Return to the last list element at the top of the list.
      this.autocompleteListDecorator(autocompletePredictionMarkup.lastChild, autocompleteFormField);
    }
  }
},

downKeyAutocompleteInteraction(autocompletePredictionMarkup, autocompleteFormField) {
  if (!(document.querySelector(`.pac-selected`))) {
    // Start at the top of the list.
    return this.autocompleteListDecorator(autocompletePredictionMarkup.firstChild, autocompleteFormField);
  } else {
    // Transverse the list from top down.
    const nextSibling = document.querySelector(`.pac-selected`).nextSibling;
    if (nextSibling) {
      this.autocompleteListDecorator(nextSibling, autocompleteFormField);
    } else {
      // Return to the first list element at the end of the list.
      this.autocompleteListDecorator(autocompletePredictionMarkup.firstChild, autocompleteFormField);
    }
  }
},
These sibling functions call a function, autocompleteListDecorator adding the pac-selected class to track user inputs.
autocompleteListDecorator(autocompletePredictionMarkup, autocompleteFormField) {
  if (document.querySelector(`.pac-selected`)) {
    document.querySelector(`.pac-selected`).classList.remove(`pac-selected`);
  }
  autocompleteFormField.value = autocompletePredictionMarkup.innerHTML;
  autocompletePredictionMarkup.classList.add(`pac-selected`);
},
We’re calling keyboardAutocomplete for both the tab and enter keyboard events. This function populates the original autocomplete form field with the prediction description and populates the data if selected via these inputs.
keyboardAutocomplete(predictions, predictionList, autocompleteFormField, keyCodeListener) {
  if (document.querySelector(`.pac-selected`).innerHTML) {
    for (const prediction of predictions) {
      if (document.querySelector(`.pac-selected`).innerHTML === prediction.description) {
        this.autocompleteServiceListener(prediction, predictionList, autocompleteFormField);
      }
    }
    document.querySelector(`.pac-selected`).classList.remove(`pac-selected`);
    autocompleteFormField.removeEventListener(`keydown`, keyCodeListener);
  }
},
Once we’ve addressed this, we should have a fully functioning widget that does not return prediction suggestions that cannot be completed by the Place API. Let’s take a final look at the widget with the bug and our custom widget (with some updated styling).
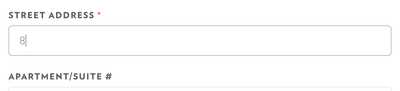
Original Buggy Widget (unknown street number stripped):
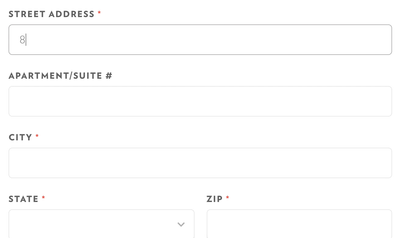
Custom Widget (bug fixed, preserves input):

Maintenance and Internationalization
So we’ve created our custom widget, but at what cost? That has to be determined by you or your organization. Is the value added by having precise results for all users that interact with your form greater than the cost to maintain this custom widget? The snippets of code above will need to be understood, maintained and updated in perpetuity. Google’s prepackaged widget works well for most use cases all of the time, but for certain applications it’s not enough – particularly when it comes to shipping. One disadvantage is that this fix is US-centric. If you need to extend it to include addresses in the UK, or other countries, the way that you would have to filter results to maintain the same degree of accuracy will change as a by product of the way that different countries format their addresses. A thorough exploration must occur when considering a custom implementation of any 3rd party API’s widget.
Lessons Learned
This journey through the Google Places Autocomplete API, from initial implementation to discovering the bug and resolving it, has given us a framework for addressing these kinds of bugs when it comes to 3rd party JavaScript APIs. First, before we code anything, we should have a clearly defined user story so that we can determine whether any implementation is a success. Second, we need to examine the data that’s returned so that we know what it is and where in the event chain that state changes. Third, become familiar with the 3rd party API and explore any auxiliary methods that may resolve the bug on it’s own, or note all the methods that we may need to call if we build a custom solution. And finally, visually document all possible interactions.
Whenever I’ve been tasked with building a custom solution, I’ve found that it’s easiest to first write out the solution and steps in plain language before coding. This makes writing well named, self-documenting functions easy; which ensures that our custom solution is maintainable, especially when the API changes. Now this is just one solution to the original bug, but it doesn’t mean that it’s the only solution. If this series intrigues you, you’d like to correct my relaxed usage of the single responsibility principle, or have strong feelings about any of the code I’ve included throughout, check out our opening for a Front End Developer. We’d love to talk to you.

