
We recently launched our first Drupal 8 site--actually it’s this very site that you’re reading! While this wasn’t our first time using or developing for Drupal 8, it was our first full site build and launch on the new platform. As such, it was the first time we needed to handle Drupal 8 code deployments. While I’ve previously covered the benefits of using Jenkins, this post will take you through the steps to create a proper Drupal 8 deployment and how to integrate GitHub and Slack along the way. In other words, you’ll see our current recipe for deploying code automatically, consistently and transparently.
First Things First: Some Assumptions
This post assumes you already have a Jenkins server up and running with the following plugins installed:
-
GitHub Plugin (has a handful of dependencies)
If you don’t yet have these things ready to go, getting a Jenkins server setup is well documented here. As is how to install Jenkins plugins. For us, we typically use a Linode instance running Ubuntu LTS for our Jenkins servers. This post also assumes that the external environment you’re trying to deploy to already has Drush for Drupal 8 installed.
Example Deployment Script with Drush
Before we dive into setting up the Jenkins job to facilitate code deployments, I’d like to take a look at what exactly we’re trying to automate or delegate to our good friend Jenkins. At the heart of virtually any of our Drupal deployments (be them Drupal 7, 8 or otherwise) is a simple bash script that executes Drush command in succession. At a macro level, this typically means doing the following, regardless of version:
- SSH to the server
- Change directory to repository docroot
- Pull down latest code on the
mainbranch - Clear Drush cache
- Run database updates
- Update production configuration
- Clear Drupal caches
In Drupal 7, where we relied heavily on Features to deploy configuration, we would typically do something like this:
  echo ""
  echo "Switching to project docroot."
  cd /var/www/drupal-7-project/docroot
  echo ""
  echo "Pulling down latest code."
  git pull origin main
  echo ""
  echo "Clearing drush cache"
  drush cc drush
  echo ""
  echo "Run database updates."
  drush updb -y
  echo ""
  echo "Reverting features modules."
  drush fra -y
  echo ""
  echo "Clearing caches."
  echo ""
  drush cc all
  echo ""
  echo "Deployment complete."
In Drupal 8, we have the magical unicorn that is the Configuration Management System, so our deployments scripts now look something like this:
If you’re familiar with creating Jenkins jobs already and are just looking for a Drupal 8 deploy script, these next lines are for you.
  echo ""
  echo "Switching to project docroot."
  cd /var/www/chromatichq.com/docroot
  echo ""
  echo "Pulling down the latest code."
  git pull origin main
  echo ""
  echo "Clearing drush caches."
  drush cache-clear drush
  echo ""
  echo "Running database updates."
  drush updb -y
  echo ""
  echo "Importing configuration."
  drush config-import -y
  echo ""
  echo "Clearing caches."
  drush cr
  echo ""
  echo "Deployment complete."
Seriously, configuration management in Drupal 8 is amazing. Hat tip to all of those who worked on it. Bravo.
Another notable difference is that with Drupal 8, clearing caches uses the cache-rebuild Drush command or drush cr for short. drush cc all has been deprecated. R.I.P. little buddy. ⚰
If you have a site that needs to be put into "Maintenance mode" during deployments, you can handle that in Drupal 8 with drush sset system.maintenance_mode 1 to enable and drush sset system.maintenance_mode 0 to disable.
Creating our Jenkins Slave & Job
Now that we’ve covered what it is we want Jenkins to handle automatically for us, let’s quickly run down the punch list of things we want to accomplish with our deployment before we dive into the actual how-to:
- Automatically kickoff our deployment script when merges to the
mainbranch occur in GitHub - Run our deployment script from above (deploys latest code, imports config, clears caches, etc.)
- Report deployment results back to Slack (success, failure, etc.)
Create Your Jenkins Slave
For Jenkins to orchestrate anything on a remote box, it first needs to know about said box. In Jenkins parlance, this is known as a "node". In our case, since we’re connecting to a remote machine, we’ll use a “Dumb Slave”. Navigate to Manage Jenkins > Manage Nodes > New Node
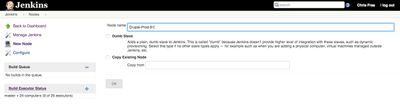
At Chromatic our naming convention matches whatever we’ve named the machine in Ansible. For the purposes of this article, you can just name this something that makes sense to you. Example:Drupal-Prod-01
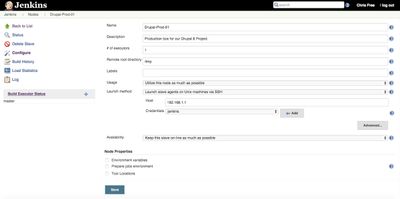
As part of the creation of this node, you’ll need to specify the Host and the Credentials Jenkins should use to access the box remotely. If you don’t yet have credentials added to Jenkins, you can do so at Jenkins > Credentials > Global credentials (unrestricted). From there things are pretty self-explanatory.
Setup the Basics for our Jenkins Job
Now that we have a way for Jenkins to target a specific server (our slave node) we can start building our deployment job from scratch. Start by navigating to: Jenkins > New Item > Freestyle Project.
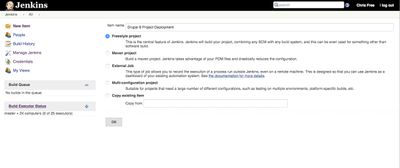
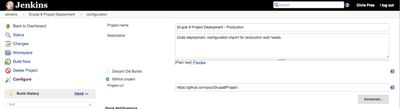
From there press "OK" and move on to setting up some basic information about your job, including Project Name, Description and the URL to your GitHub repository. Pro tip: take the time to add as much detail here, especially in the Description field as you can. You’ll thank yourself later when you have loads of jobs.
Configure Slack Notification Settings (optional)
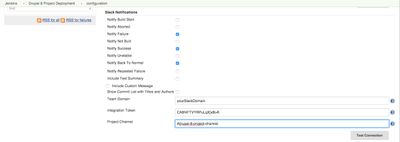
Assuming you’re interested in tying your deployment status messages to Slack and you’ve installed the Slack Notification Plugin, the next step is to tell Jenkins how/where to report to Slack. You do this under the Slack Notifications options area. As far as notifications go, we prefer to use only the "Notify Failure", “Notify Success” and “Notify Back To Normal” options. This is the right mix of useful information without becoming noisy. To allow Jenkins to connect to your Slack channels, you’ll need to follow these steps for adding a Jenkins integration. Then just fill in your Slack domain, the integration token from Slack and the channel you’d like to post to. These settings are hidden under “Advanced…”.
Configure Where this Job Can Run
This is where we instruct Jenkins on which nodes the job is allowed to run. In this case, we’ll limit our job to the slave we created in step one: Drupal-8-Prod-01. This ensures that the job can’t run, even accidentally, on any other nodes that Jenkins knows about. Jenkins allows this to be one node, multiple nodes, or a group.

Configure GitHub Repository Integration
Under "Source Code Management" we’ll specify our version control system, where are repository lives, the credentials used to access the repo and the branches to “listen” to. In our example, the settings look like this:
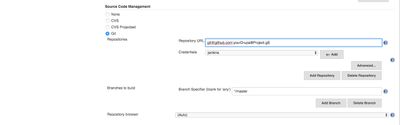
Here we’re using a jenkins system user on our servers that has read access on our GitHub repositories. You’ll want to configure credentials that make sense for your architecture. Our "Branch Specifier" (*/main) tells Jenkins to look for changes on the main branch or any remote name by using the wildcard, “*”.
Configure Your Build Triggers
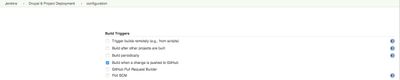
This is where the rubber meets the road in terms automation. At Chromatic, we typically opt for smaller, more frequent deployments instead of larger releases where there is a higher probability of regressions. Since we rely heavily on the GitHub pull request model, we often have many merges to main on any given day of development for an active project. So we configure our deployments to coincide with these merges. The following setup (provided via the GitHub Jenkins Plugin) allows us to automate this by selecting "Build when a change is pushed to GitHub".
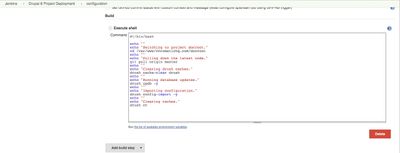
Setup Your Deployment Script
Here’s where we’ll implement the example deployment script I wrote about earlier in the post. This is the meat and potatoes of our job, or simply put, this is what Jenkins is going to do now that it finally knows how/when to do it.
Under "Build" choose “Add build step” and select “Execute shell”. Depending on your installed plugins, your list of options might vary.

Then add your deployment script to the textarea that Jenkins exposed to you. If you want somewhere to start, here is a gist of my job from above. When you’ve added your script it should look something like this:
Last Step! Enable Slack Notifications
Although earlier in the job we configured our Slack integration, we still need to tell Jenkins to send any/all notifications back to Slack when a build is complete. You do this sort of thing under the "Add post-build action" menu. Select “Slack Notifications” and you’re good to go.

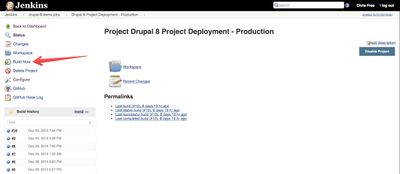
Our deployment job for Drupal 8 is now complete! Click "Save" and you should be able to start testing your deployments. To test the job itself, you can simply press “Build Now” on the following screen OR you can test your GitHub integration by making any change on the main branch (or whichever branch you configured). With the setup I’ve covered here, Jenkins will respond automatically to merges and hot-fix style commits to main. That is to say, when a PR is merged or when someone commits directly to main. Of course no one on your team would ever commit directly to main, would they?!
Wrapping Up
Assuming everything is setup properly, you should now have a robust automatic deployment system for your Drupal 8 project! Having your deployments automated in this way keeps them consistent and adds transparency to your entire team.


